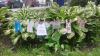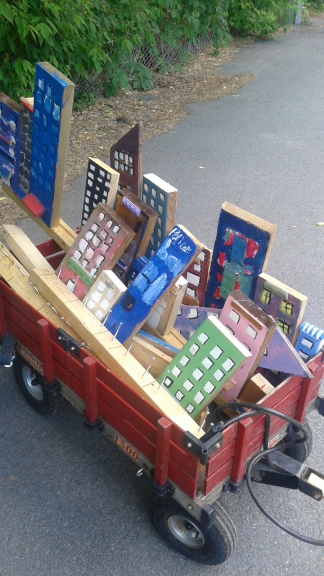
By Yvette Salinas, of the NDG Art Hive and St-Raymond's Cheap Art Collective When an Animator with the After School program at the St. Raymond Community Center let me know the kids were asking to do another Art Project (they had helped with the Haunted Melrose Tunnel and Kay Noele’s Quilted Quartier project), Jody Negley’s St. Henri project instantly came to mind. Besides celebrating the beauty of the city, there was something about it that had plenty of potential as a group art project. If I could stumble upon enough wood, each child could decorate a single piece that would go into the collective result. That was the real appeal: every piece of wood was to be “cast-off bits” from “local handymen, construction sites, garbage day and any lumberyard” (quoted from Jody Negley’s introduction to her project). Neighbors and friends were very eager to donate their extra wood when asked. As the wood pile grew, so did plans for the workshops with the the After School group. Our biggest worry was the paint: since the end result would stay outside, the paint needed to be waterproof..in other words, unwashable. In a large group of children, that could mean trouble: many of them wore school uniforms, plus there was a big chance paint would get on the walls of floors of the Center. Talking to Agi and Simeon of Commité Jeunesse, we decided to paint outside, with only half the AS group, wearing whatever smocks I could find. Despite the adult’s worries, everything was just fine. Well, it was our usual creative chaos. The step-by-step plans I made flew out the window. Not because the kids were unruly, but because they were so eager. After choosing their board from an assortment of sizes, they wrote their names on the back and drew plans for windows and doors. I insisted every window be filled with white or yellow paint so there was some uniformity, but after that everything was up to them. I was extremely grateful to Melanie Stuy and Cindy Haughton for coming out to help with the distribution of brushes, paint, glue, woodbits for decoration, glasses of water to clean brushes, and still more paint. The results of our first workshop were so cute! Our second workshop, they had a chance to finish painting details and glue on extras such as sequins. Some older kids who hadn’t had a chance the week before asked if there were any materials left for them. Of course! I was touched by how politely they helped me clean the paintbrushes. Anyone who was done decorating was ready for the next step in the process: assembly. Working on Jody’s advice, the plan was to screw each building to a longer board. I held the boards in place as the children took turns with a manual screwdriver. It wasn’t easy. We all twisted too quickly and managed to scrape our hands. But at the end of the 2nd workshop, a few rows of buildings were ready. Now came the hardest part. A tricky issue was the length of the garden bed. I had measured it at 14.5 ft, and had more than enough materials…but the more I worked against gravity the more I realized that length would be difficult to keep standing. Melanie had the brilliant idea of creating two end caps built with 3 sides each to prevent tippy, that could be connected with rope for the rest of the garden border. If the small wooden buildings were our imaginary city, the real garden was the greenspace we’d love to see central to our city. And the string could be a clotheline—featured in many CAC projects because of the ease in displaying art on clothespins. Some time in all of this, I forgot the Cheap Art Collective’s purpose, and I did most of the work myself. Since all the materials were at my home, I’d use any free time I had to connect another individual piece. This took many weeks and I learned many things, such as how knots in the wood were a nightmare to screw into place that led to much cursing and very often pain. The screwdriver, by the way, broke by the end of this. My husband Mikon–who had shown me to pre-drill holes in thinner boards so they wouldn’t split–taught me how to use the electric screwdriver for the final attachments. With many squeals I learned how to use it, where to lean my weight. Somehow, everything came together. My daughter Isabelle helped me bring the largest pieces over to the St. Raymond Community Centre (feeling very self-conscience all the way). They were held together with zipties and yet more screws (done with a broken screwdriver, naturally). The clothes on the line were a perfect way to thank everybody involved, especially Jody. Although it was such a long process, I hope this is the first of many cityscape garden fences made in St. Raymond. Next time, I won’t hesitate to ask for more help. ~Yvette~